
This is Part 2 of a three-part blog series by L4 and Celer about state channels. In Part 1, we gave a high level overview of state channels and introduced the reader to the basic concepts. In Part 2 we cover how developers can use state channels in their applications. In Part 3 we will then examine state channel architecture in more detail.
Today, most “normal” dapps — those that do not use state channels — work relatively simply. Transactions are generated client-side and then sent to the entire network to be mined and added to the blockchain.
But state channels introduce an entirely new paradigm for developing decentralized applications. Applications must be written to handle the deposit and withdrawal of on-chain funds to off-chain enabled wallets, as well as allocating and deallocating those funds to applications that work by signing state updates that are directly sent to counterparties. Because of this, it is important to be very thoughtful in the design of your application. In this post, we’re going to walk through the steps you need to take as a developer to use state channels effectively in your dapp.
First, understand your use case.
Before you can begin to build your application to use state channels, you need to have a firm understanding of your use case and how state channels improve the user experience. As a reminder from Part 1 of this series of blog posts, there are a handful of very solid scenarios where using a state channel makes perfect sense:
1. When a specific session involves a relatively small number of participants.
The best example of this is peer-to-peer payments. These are very short-lived sessions of just 2 people each, a sender and a receiver. Another example is a board game, like tic-tac-toe, again just 2 people but longer lived than a simple payment.
However, it is very important to know what we mean by session. A session is not an application and an application can concurrently contain multiple sessions and therefore have a lot of users at the same time.
One such example is a video streaming tipping platform where we have a lot of users but each session may only involve the tipper and performer. Or a decentralized exchange where we have a lot of traders, but one session only involves a buyer and seller.
2. When your application requires snappy, fast UX.
Payments and games also require a very fast user experience. When your users click “pay” or make a move in a game of tic-tac-toe, you do not want them to have to wait for any amount of time before the UI updates.
3. When there will be a very large number of transactions between users.
Because state channels require unanimous consent, there are no fees and the latency of state updates is only as long as it takes to get every user to accept the latest update. This means applications with an enormous number of interactions, say a high-frequency synthetics exchange or pay-per-byte streaming micropayments.
4. Where you don’t have to change participants in one interaction session too often.
Although state channels preserve the lack of fees or wait-times for operations when the set of participants is fixed, it is just one on-chain transaction to change the participant set if you ever did need to. Because of this, applications, where the participant set changes once-in-a-while but not too frequently can also make sense. Examples of this include coin mixers and proof of stake validator systems.
Then, understand the full lifecycle of your application.
Just like any decentralized application, your application will have a certain lifecycle to it that defines the user experience. Broadly speaking, you can think of this lifecycle in terms of four different rounds which are:
1. Allocate some of the user’s funds towards your application
When a user is interacting with your application, the first thing they need to do is make the decision about whether or not they actually want to allocate their money to it. This part is the equivalent of “sending money to a smart contract” for regular “layer 1” dapps.
This is the initial funding step. In this part of the cycle, you need to be thinking about what the user experience will be in making this decision; for example, what are the input variables that define their initial state? In the case of a sports betting app, this involves a user experience where the user would select the person they are betting against, the bet amount, and the conditions of the bet.
2. Progression of the state of the application
Next, once an application is funded, the context switches entirely over into the “running application” part of the lifecycle. This is the part of the application that really benefits from the instant response times of state channel applications and is when your application will be responsible for translating user actions into state updates.
3. Reaching an outcome for the application
An application is responsible for always being able to reach an outcome. An outcome, in this context, is just some piece of data that represents what “happened” in this application. For example, in the betting context, the outcome would be the result of the bet. In a game of tic tac toe, the outcome is either that X won, O won, or it was a draw.
This is important to communicate to the user at all parts of the application lifecycle so that they know what would be the end result if their counterparties were to abruptly leave at any stage. For example, in a game of tic tac toe, the outcome of the application would be that whoever made the last move on the board wins the game, assuming no future move is made. A user should always know the outcome and it should be communicated clearly on the UI.
4. Finishing the sessions and interpreting the outcome
Finally, once the application has reached a point where there is a universally finalizable outcome, meaning that the state has reached a natural “terminal ending point” (e.g., the bet has a clear winner, or the game of tic tac toe is over and no more moves can be made) then the final part of the application lifecycle is to close the session and move the funds back to the user’s wallets as dictated by the interpretation of the outcome.
After you have built a solid base on which you can describe the requirements of your use case that state channels need to satisfy and you understand the lifecycle, you need to begin to separate the application state and its state transition logic from the effect that you want to enforce on-chain.
Here is a simple table separating these components for some common applications:

After you’ve thought about these components you can begin to think about writing some of the code that will enforce all of this logic for your application.
Write the state transition logic for your application smart contract
Let’s take one of the examples from above, tic-tac-toe, and write out the basic components that we are going to need for our contract code.
The structure of the state. For a simple game of Tic Tac Toe, we only need to keep track of two pieces of information about the application; the state of the board and whether or not there is a 3-in-a-row (in which case, store who won). For the board we can use an array of 9 elements representing either an empty square, a square with an “X”, or a square with an “O”. This might look like the following Solidity code:
enum PlayerType { None, X, O }
struct AppState { Square[9] board; PlayerType claimToVictory }
Of course, at the start of the application the board is empty and the claimToVictory is the None type. To see a real-world example, checkout Celer Network’s Gomoku contract.
The state transition logic. Again, Tic Tac Toe lends itself to some very simple state transition logic. In this case, players can either place an X or place an O.
function placeX(AppState state, uint8 pos) pure returns (AppState);
function placeO(AppState state, uint8 pos) pure returns (AppState);
These two functions can both be implemented with fairly straightforward logic that simply makes sure that state[pos] is Square.Empty, claimToVictory is None, and then does a check for a 3-in-a-row and if there is one, sets claimToVictory to X or O. You could also refer to a real world example of Celer Network’s Gomoku contract’s updateByAction.
Write the outcome and effect logic for your application smart contract
The outcome. Next, you can begin to write down what the outcome will be for your application. This is where it gets slightly tricky, because you will want to handle not just the logic for the “final” outcome of your application (e.g., in our tic-tac-toe example, when the board has no more moved left), but also the intermediary states (e.g., where the board is partially full). Let’s look at tic-tac-toe.
- If the claimToVictory is X or O then the outcome should encode a piece of information that states “the player playing as X (or O) has won.”
- If the claimToVictory is None then if there are more X’s on the board than O’s (or vice versa), then encode some information that states “the player playing as X (or O) has won”.
We need to handle the second scenario above in order to handle edge cases. For instance, consider the following scenario. A player X has been playing fairly, but the other player O has gone offline and is no longer making any moves at all. If X were to go on-chain with the latest state of the board, wait the challenge period, and have the game end at this partially-finished point, X should be considered the winner, since O has effectively forfeited. One easy way to do this is to separate the two scenarios into two outcome generation functions, such as winGame and finalizeOnTimeout.
The effect. Finally, once you understand what the outcome should be, you need to make sure any effects you are intending to happen on-chain line up with this outcome. For example, it could be the case that you want your tic-tac-toe users to be betting with ETH, or with Dai, or with some other kind of blockchain currency. The interpretation of the outcome is what we call the effect, and this can be set by APIs that a state channel framework will provide to you.
NOTE: If you want to explore an example smart contract that has been written in accordance with this example, you can check out this gist or Celer Network’s Gomoku full contract in mainnet production.
Use a state channels SDK to write the application’s offchain logic.
Your users are either going to connect to each other through a direct state channel or through an intermediary. Just like in Lightning how you can route payments through intermediaries; in state channels you can have intermediaries lock up funds for the duration of the application that, when it is over, routes a payment.
In the case of the Celer Network and in many state channel contexts that applications are most likely to be within, the application will communicate to a wallet (e.g., CelerX) that is connected to a large state channels network (e.g., the Celer Network).
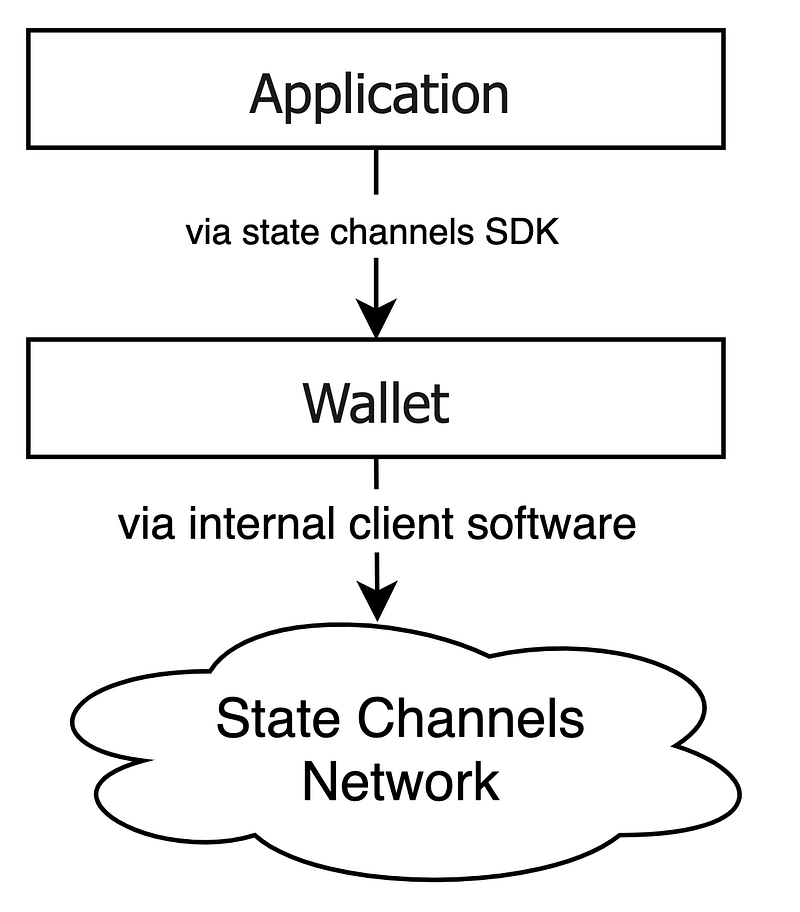
This means that it is the applications responsibility to communicate to the wallet software its intent based on the user actions. Thus, state channels SDKs offer API methods that handle each of these scenarios for you as an application developer:
1. Initially depositing funds into the state channel network.
Usually, as an application, you can assume that it is the wallet’s responsibility for ensuring there are easy ways for a user to choose to deposit funds into the network. As an application, you will want to use the wallet’s API to verify enough funds are available and prompt the user to deposit if need be. Usually, the depositing and withdrawal of funds are handled by the wallet software. However, it can also be exposed by the lower-level APIs of the client.
2. Choosing to allocate some of those funds to a particular application.
The state channels SDK will offer a method for your application to specify the exact smart contract logic that will be used for your application, the amount of funds you want to allocate to the application, and the parameters of the initial state that will be set when you allocate the funds. This process can be further abstracted away with a higher level API or SDK when the pattern is common, such as eSport games. Just like the depositing APIs, lower-level APIs for the client software will provide direct access to conditional payment functionalities.
3. Generating and signing state updates to progress the application along
The most fundamental part of the interaction is also offered by the SDK; creating and signing new state updates to be sent to your users’ counterparties. For example: the sendState and onStateReceived functions in the Celer SDK.
4. Ending a session and sending the conditional payment
Finally, when an application is determined to be in a terminal state, the state channels SDK offers a method to finish the session and distribute the funds using conditional payments. These APIs are available in lower-level APIs client with explicit reference to the specific application session. For specific application use cases, these APIs can be abstracted at a higher level, such as these examples of win, lose, draw function calls.
As you can see, these scenarios match exactly with the application lifecycle that was described in section II.
— — — —
So, we have described the first 5 steps you need to follow when thinking about writing a dapp that uses state channels.
- First, understand your use case.
- Then, understand the full lifecycle of your application.
- Write the state transition logic for your application.
- Write the outcome and effect logic for your application.
- Use a state channels SDK to set up the application.
There is still a lot more to cover and technical depths we can dive into as we continue this series. Stay tuned for Part 3, where we will dive into some of those depths when we cover the internals of the state channels client software that wallet software will be running and that power the SDKs your applications will use.
Don’t want to miss the updates? Sign up the newsletter below! 👇👇